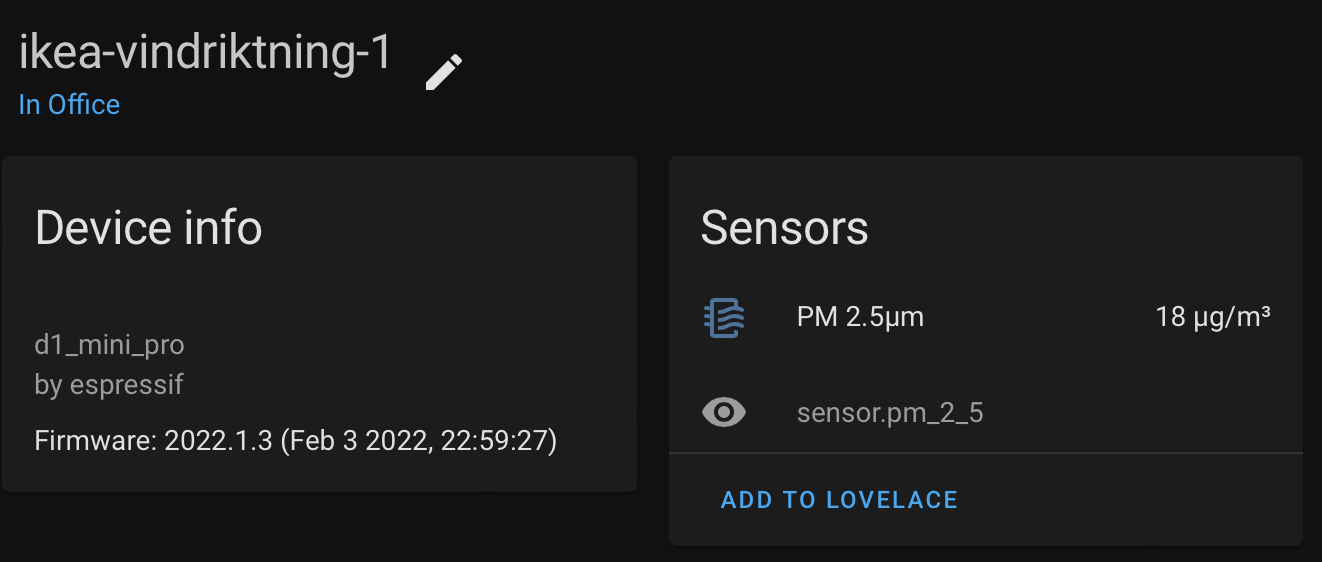
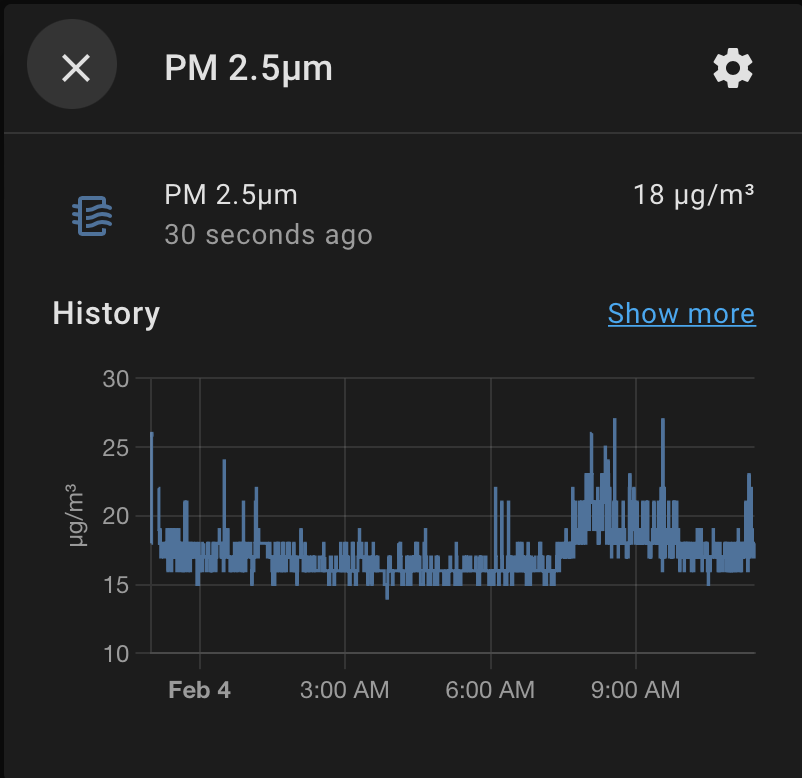
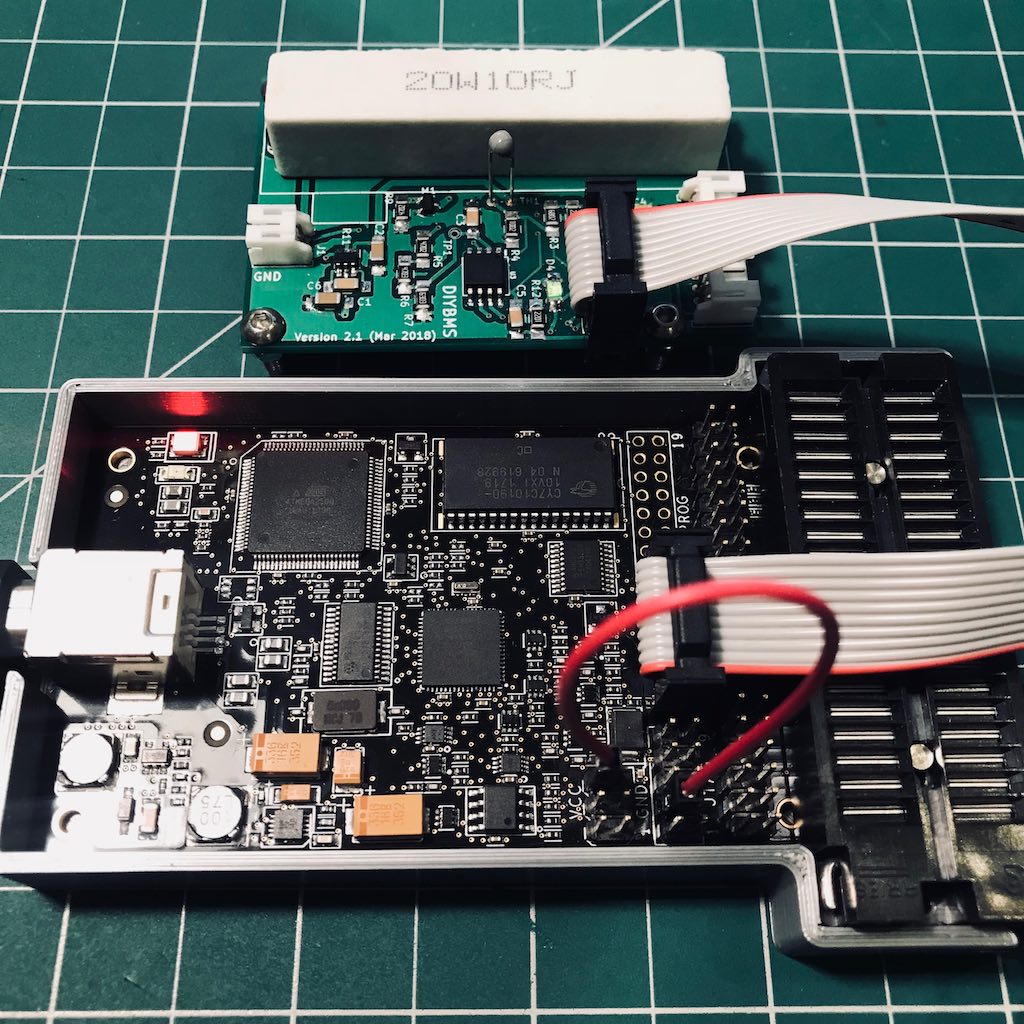
An Internet of things

Musings on iOS and PHP development, IOT and other bits and pieces

Programming the ATTiny with AVR Dragon and the Arduino IDE on macOS in 2018

Recently I’ve been working on a project utilising ATTiny85 microcontrollers and Arduino. At first glance it wasn’t obvious if it was possible to use the AVR Dragon with Arduino or macOS High Sierra, but after some trial and error it turns out the Arduino toolchain supports programming via ISP on the Dragon quite well!

In addition to ISP programming on macOS, there was an extra step required to to power the ATTiny from the Dragon, I have covered that below.

ATTiny85 connected to AVR Dragon on macOS via ISP

macOS, Dragon, ATTiny, Arduino in 2018

Current production versions of the Arduino IDE (1.8.5), it’s bundled version of avrdude (modified 6.3) and ATTinyCore (1.1.5) all work ‘out of the box’ and macOS High Sierra (10.13.5) requires no additional kernel extensions or drivers to use the Dragon, unlike the ATMEL ICE.

Easy to find articles on running the Dragon on macOS were written prior to the renaming of Mac OS X to macOS (2016) and the addition of the Library Manager and Board Manager in Arduino 1.6.x (early 2015). James Gregson (2012) and Jay Wiggins (2015) write about using the Dragon on Mac OS X and demonstrate the installation of avr toolchain components like avrdude, avr-libc, and avr-crosspack via homebrew rather than using Arduino.

Jay mentions as a foot note, the possibility of requiring a custom kernel extension to run the Dragon since the ATMEL ICE requires one. This looked sensible given the ATMEL ICE’s requirement but it is unnecessary. From my experience the Dragon does not require a custom kernel extension to operate on a mac.

Setup Arduino, ATTinyCore

Download the Arduino IDE package from arduino.cc and add ATTiny support with SpenceKonde/ATTinyCore using the “Additional Boards Manager URLs” setting. ATTinyCore has detailed installation instructions.

Arduino IDE 1.8.5 Additional Boards Manager URLS settings dialog

While you’re in settings enable “Show verbose output during: upload” to see more output when Arduino is interacting with the Dragon via avrdude.

Arduino IDE 1.8.5 Verbose output during upload settings dialog

Using AVR Dragon as a Programmer

Note: The Dragon will not appear as an option in the list of available ports like you would see an Arduino Uno or a USB serial programmer.

Open a project you’d like to flash to your ATTiny, from the Tools menu set the appropriate board (ATTiny 25/45/85) and select the programmer “AVR Dragon ISP mode (ATTinyCore)”.

Arduino IDE 1.8.5 Select ATTiny board ATTinyCore

Arduino IDE 1.8.5 Select programmer for AVR Dragon

Select “Upload” and if you’ve set verbose mode as highlighted above, you’ll see all the verbose output from Arduino (avrdude) communicating with the Dragon.

A basic command to test the Dragon’s connectivity would be:

~/Library/Arduino15/packages/arduino/tools/avrdude/6.3.0-arduino9/bin/avrdude \
-C ~/Library/Arduino15/packages/ATTinyCore/hardware/avr/1.1.5/avrdude.conf \
-p attiny85 -vvvv -c dragon_isp -P usb

The output with -vvvv is very verbose. The number of vs can be reduced.

Setting Fuses

ATTiny85 doesn’t use a bootloader like a normal Arduino, but the “Burn Bootloader” item in the Tools menu can be used to set fuses. Read the descriptions on the different ATTiny fuses over on the ATTinyCore README.

Powering ATTiny from Dragon

Given my ATTiny chips don’t have their own power source, after connecting the ISP headers of the Tiny’s board and attempting up upload via Dragon I encountered this error:

avrdude: jtagmkII_setparm(): bad response to set parameter command: RSP_NO_TARGET_POWER

An article by Josh Levine shows an easy way to provide power to the ATTiny via the ISP cable by placing a jumper from one of the the Dragon’s VCC pins to the unutilised JTAG pin 4. A continuity test with a multimeter shows JTAG pin 4 and SPI pin 2 are connected.

The image below shows a simple jumper from VCC to JTAG pin 4.

Power ATTiny with AVR Dragon JTAG pin 4 to VCC

In hindsight, section 4.5 on SPI programming in the Dragon User Guide mentions this power requirement since my ATTiny is essentially ‘on board’:

AVR Dragon must sense the target voltage on pin 2 on the SPI header in order to set up the level- converters. For on-board targets, the voltage must be supplied from pin 2, 4, 6 on the VCC header (5V) into pin 2 (VTG) on the SPI header.

Footnote: Updating Dragon Firmware

The current version of AVR Dragon firmware is 7.39. My Dragon purchased June 2018 came with an older version out of the box. As far as I’m aware to update the Dragon’s firmware you will need to use Atmel Studio on a Windows machine or boot up a Windows VM.

I’m unsure whether or not the firmware update is necessary to run the steps above.

Automatically Generating your Swift API Client with Swagger and Swagger Codegen

At the April 2017 Melbourne CocoaHeads meetup I presented on using Swagger Codegen to automatically generate a Swift 3 API client based on a Swagger spec.

I started with an introduction to Swagger using a spec for the Melbourne CocoaHeads Events API spec and implemented a basic CocoaHeads iOS project.

At the September “Swift 4” meetup I presented a quick five minute demo generating Swift 4 code from swagger codegen. The main purpose was to show the reduction in the amount of boilerplate code generated for Swift 4.

The $33 IKEA Standing Desk

I was recently inspired by the sheer simplicity of $22 IKEA Standing desk by Colin Nederkoorn. The “Standdesk 2200” uses basic IKEA components to easily create a standing desk conversion for your existing space.

I set out this weekend to replicate and localise Colin’s instructions for the Australian IKEA shopper. Colin’s original $22 USD price point holds up perfectly in 2015. Converted to Australian dollars, we have the $33 IKEA Standing Desk.

All prices mentioned here are in Australian dollars and include 10% GST.

$33 IKEA Standing Desk

Components

Total Cost: $33

Measurements

I recommend reading Colin’s article, as he highlights two main measurements; the keyboard height and the monitor height.

For my setup, I measured the distance from my elbow to the floor and assumed I’d be able to adjust the screen height to suit once I was standing at the desk. The distance from my elbow to the floor was almost exactly 1 meter.

Key Dimensions

  • Keyboard height: 1000mm
  • Lower desktop height: 725mm
  • Upper desktop height: 1175mm
  • Thunderbolt Display top: 1730mm
  • Desk depth: 755mm

Construction

  • Construct the LACK table as per the instructions and place it on top of your existing desk.
  • Take your elbow dimensions and work out at what point to screw in the brackets.
  • Place the shelf on top and screw it in place, allowing space on one side for your pointing device.

Notes

  • The legs of the top LACK table are hollow. Wood screws with long unthreaded shanks won’t work with the hollow legs.
  • The legs on the LACK table don’t meet the table top below evenly at 90 degrees, (probably because it’s a $7 table). This makes the shelf sit unevenly on the brackets. I just use two screws to secure the shelf, one at each end. The shelf is completely stable even though it’s not sitting 100% flush with the brackets on one end.

Nitty gritty details of the keyboard shelf Close up of the screws used $33 IKEA Standing Desk

Premium Upgrades

IKEA have a pricier versions of the LACK table and the EKBY shelf that are heavier (less hollow) with better finishes. I think these options are worth considering. At the store I felt the JÄRPEN shelf was much sturdier than the $5 cheaper ÖSTEN. I purchased the JÄRPEN shelf.

Total Premium Cost: $38-50

Full Office Fit Out

$33 IKEA Standing Desk

I realised that the remainder of my setup is also IKEA:

Other Accessories

Initial Standing Observations

  • Immediately, touch typing becomes essential when standing and looking forward. Looking down at the keyboard is slow.
  • Having the keyboard and mouse on a different level to other desktop peripherals makes a lot of sense.
  • The total depth of the desk is 755mm, up from 600mm which doesn’t fit my room as well. There’s about 100mm of wasted space behind the display.
  • MacBook Pro doesn’t fit on the upper desktop, it will be a bit awkward plugging and unplugging it, especially if the cable falls behind the desk.
  • Cable runs are a bit longer for items that were previously closer to the thunderbolt display.
  • The flooring in my room is carpet, which is good for standing but creates minor wobbles when typing.
  • There is only 50mm difference between the depth of the top and bottom desks. With the LACK table currently sitting on top of my the other with no other support, this might be risky longer term. Having said that this feels quite sturdy with so much weight on the top shelf.

A photo posted by Jesse C (@sirjec) on

Profiling PHP Apps on OSX 10.9 with Xdebug and Kcachegrind

It’s straight forward to generate Xdebug profiler output and visualise the bottlenecks associated with running any request that’s run through the PHP stack.

Here’s how you’d install PHP, Xdebug and Kcachegrind (qcachegrind) on OSX 10.9 Mavericks and get some in depth info on your php app.

qcachegrind on OSX 10.9 Mavericks

Install Homebrew

Make sure you have homebrew installed correctly.

The main thing to remember is to add /usr/local/ to your shell’s $PATH. Often it’s best to have it first so it overloads the system’s default applications. brew doctor will complain if this isn’t the case.

Add PHP Packages to Homebrew

PHP packages of OSX are not available to homebrew by default. The homebrew-php repository is the source of truth for PHP related recepies.

The homebrew-php README is verbose, on Mavericks you only need to run the following:

brew tap homebrew/dupes
brew tap homebrew/versions
brew tap josegonzalez/homebrew-php

This will give you access to all the php specific formulas.

Install PHP

Install PHP 5.3.x with the following commands:

brew install php53

Once installation is complete the formula tells you what to add to your httpd.conf to run the libphp5.so. Take note of the location of the php.ini file. The system default location is /etc/php.ini.default.

You can get back to the post-install info of any homebrew package with brew info php53.

# To enable PHP in Apache add the following to httpd.conf and restart Apache:
#    LoadModule php5_module    /usr/local/opt/php53/libexec/apache2/libphp5.so
#
# The php.ini file can be found in:
#    /usr/local/etc/php/5.3/php.ini

Open your apache config at /etc/apache2/httpd.conf and replace the existing (possibly commented out) LoadModule php5_module line with the LoadModule line from above.

Restart the apache process with:

sudo apachectl restart

Notes

I like to add index.php as a DirectoryIndex option. Find the <IfModule dir_module> section of the apache config and add index.php after index.html.

<IfModule dir_module>
    DirectoryIndex index.html index.php
</IfModule>

The arguments passed to the PHP compiler are visible in abstract-php.rb once you have everything running within apache the same variables are shown at the top of the phpinfo(); output under Configure Command.

The relevant options that will pick up the not-yet-installed XDebug config file and the php.ini file are:

def install_args
    args = [
    # ...
    "--with-config-file-path=#{config_path}",
    "--with-config-file-scan-dir=#{config_path}/conf.d",
    # ...
    ]

Install Xdebug

Install the appropriate Xdebug version for php5.3

brew install php53-xdebug

The notes from the installation mention the location of the Xdebug config file.

# To finish installing xdebug for PHP 5.3:
#  * /usr/local/etc/php/5.3/conf.d/ext-xdebug.ini was created,
#    do not forget to remove it upon extension removal.

Restart apache and load up a phpinfo(); page and you should see references to Xdebug.

Configure Xdebug to Generate Profile Data

All Xdebug options are well documented, below are a minimum set of options to get profile data written.

Open the generated ext-xdebug.ini and three configuration options profiler_enable, profiler_output_dir and profiler_output_name.

[xdebug]
zend_extension="/usr/local/Cellar/php53-xdebug/2.2.3/xdebug.so"

xdebug.profiler_enable = 1
xdebug.profiler_output_dir = /Library/WebServer/xdebug-profiler
xdebug.profiler_output_name = "callgrind.%R.%t"
  • profiler_output_dir - can be any directory, but it must be writable by the httpd process that runs under the wheel user on OSX systems. By default /Library/WebServer is not writable by many users; so pick your directory appropriately.
  • profiler_output_name - this option can be a format of your choice, the line above will produce files based on the URL, suffixed by a timestamp (callgrind._bh_apiv1_cafes_371_json.1394929295)

When you change these settings, restart apache and the changes should be visible in phpinfo().

If you’re not seeing logs straight away, it’s more than likely a file permissions issue on the output directory.

Visualise Profile Data

The preferred way to install kcachegrind on OSX is to install qcachegrind and AppViz. Both components can be installed with homebrew.

Underneath the hood qcachegrind uses graphviz’s dot application to generate the graphs. dot will be available to qcachegrind if you’ve setup your $PATH correctly above.

brew install qcachegrind
brew install graphviz

After installation you should have qcachegrind in your path and you can launch it with the profile files as the first argument.

qcachegrind callgrind._bh_apiv1_cafes_371_json.1394929295

The absolute worst misuses of localised strings

As a followup to posting my Localising Cocoa Apps talk I thought I’d outline some of my favourite localised string failures.

The “I heard literal strings in code are bad” kind of localisation

NSLocalizedString(@"Next", @"");
NSLocalizedString(@"Next", nil);

The “WTF is the comment for anyway” kind of localisation

NSLocalizedString(@"Next", @"Next");

The “out of sight out of mind” kind of localisation

#define MYBadCompanyLocalizedString(key) NSLocalizedString((key), @"")

Yes, that’s redefining the macro to hide the comment…

The “entire book as a key” kind of localisation

NSLocalizedString(@"In order to determine your location, location services must be turned on in settings", @"In order to determine your location, location services must be turned on in settings");

The “key can be anything but I know what it is” kind of localisation

NSString *aStringFromAPI = [response objectForKey:@"next-title"];
NSLocalizedString(aStringFromAPI, @"api resposne for `next`");

The grey area

Duplicating keys

This is in the grey area because good distinct comments can make duplicating keys manageable as good comments show you the key’s appearances in your app in the .strings file.

NSLocalizedString(@"Next", @"RootViewController 'next' button title");
NSLocalizedString(@"Next", @"DetailViewController 'next page' button title");

//Localizable.strings
// DetailViewController 'next page' button title
// RootViewController 'next' button title
"Next" = "Next";
  • genstrings will warn you about duplicate keys
  • Bad/stupid/empty comments make this a bad offender
  • keys with nil or @"" comments aren’t picked up as duplicate

Using localised strings in format strings

This is in the grey area because it’s inflexible and implies a structure, but can be okay for small strings. Often you should consider NSNumberFormatter for numbers

button.titleLabel.text = [NSString stringWithFormat:@"4 %@, 3 %@", 
                          NSLocalizedString(@"pineapples",@"plural pineapples"),
                          NSLocalizedString(@"pears",@"plural pears")];

Localising the format string too

This is in the grey area because at this point we’ve got localised pieces everywhere. But it’s good that you’re trying though…

button.titleLabel.text = [NSLocalizedString stringWithFormat:
                          NSLocalizedString(@"4 %@, 3 %@", @"fruit quantities format string"),
                          NSLocalizedString(@"pineapples",@"plural pineapples"),
                          NSLocalizedString(@"pears",@"plural pears")];